这里是深度学习基础视频的学习笔记二
深度学习的数学基础
- 受限玻尔兹曼机:
- 谷歌不支持,很多人不知道不使用,使用受限
- 过于复杂(建模和计算)
- 有很强的理论支撑
- 自编码器变种:
- 正则编码器
- 稀疏编码器(人的大脑中对信号的激活也是稀疏的,高维而稀疏的表达是最好的)
- 去噪自编码器(能够对“被污染/破坏”的原始数据解码、编码,还能恢复真正的原始数据,这样的特征才是好的)
- 变分自编码器
- 深层网络的局部极小值主要是由多个隐层复合导致的。
卷积神经网络(CNN)
- 卷积神经网络的应用:分类、检索、检测、分割、人脸识别、人脸表情识别、图像生成、图像风格转化、自动驾驶……
- 传统神经网络VS卷积神经网络
- 深度学习三部曲:
- 搭建神经网络结构
- 找到一个合适的损失函数
- 找到一个合适的优化函数,更新参数(反向传播,随机梯度下降,……)
- 全连接网络处理图像的问题:
- 参数太多:权重矩阵的参数太多–>过拟合(若以二哈作为训练集来识别狗,测试金毛的结果却不一定是狗)
- 卷积神经网络的解决方式:
- 局部关联,参数共享
- 深度学习三部曲:
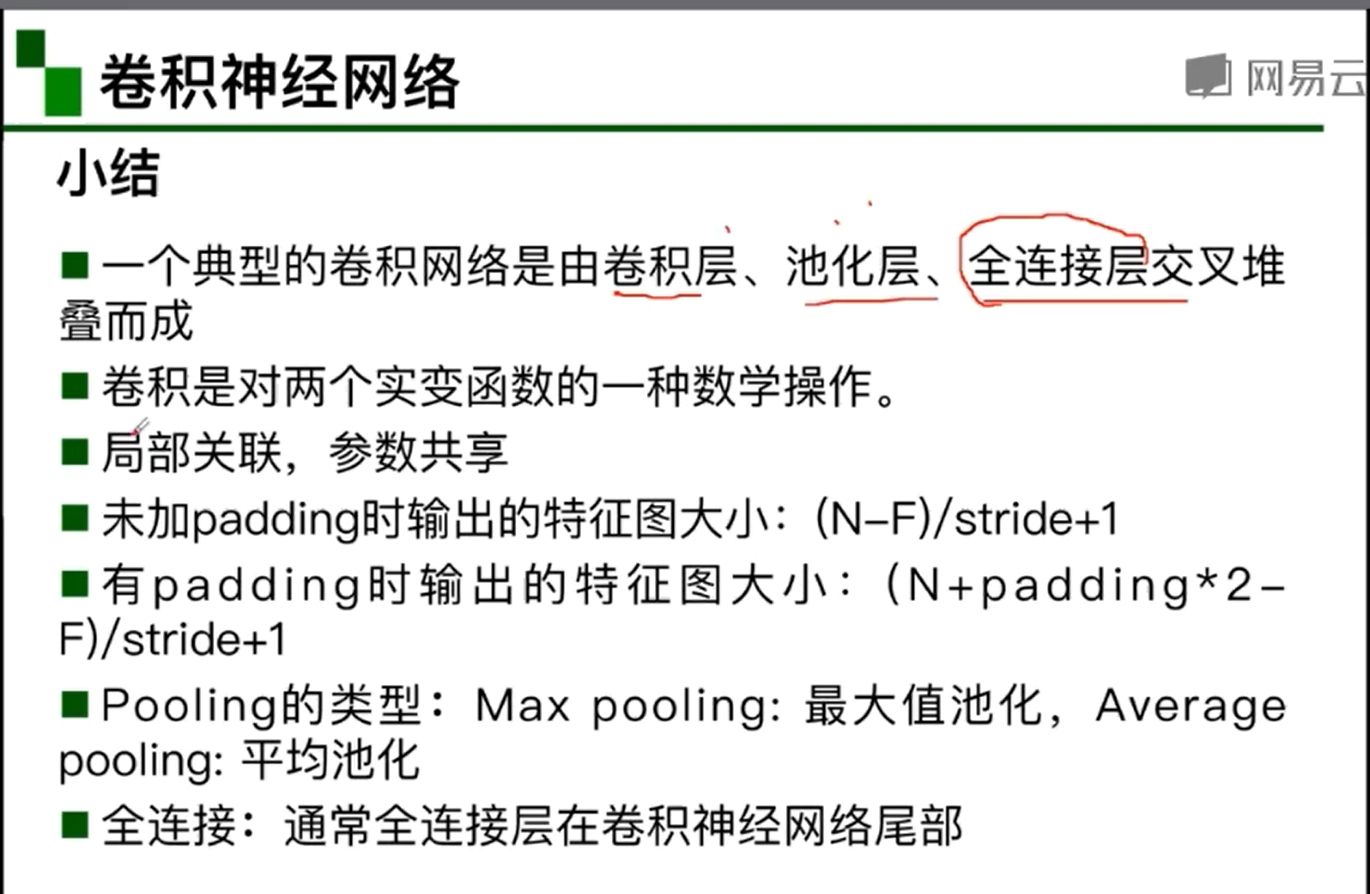
- 基本组成结构:
- 卷积:是对两个实变函数的一种数学操作。
- 卷积的可视化理解:不同的卷积核在关注不同的东西。
- 池化:(缩放)
- 保留了主要特征的同时减少参数和计算量,防止过拟合,提高模型泛化能力
- 它一般处于卷积层与卷积层之间,全连接层与全连接层之间
- 最大值池化,平均值池化
- 全连接/FC layer:
- 两层之间所有神经元都有权重链接
- 通常全连接层在卷积神经网络尾部
- 全连接层参数量通常最大
- 卷积:是对两个实变函数的一种数学操作。
- 【小结】

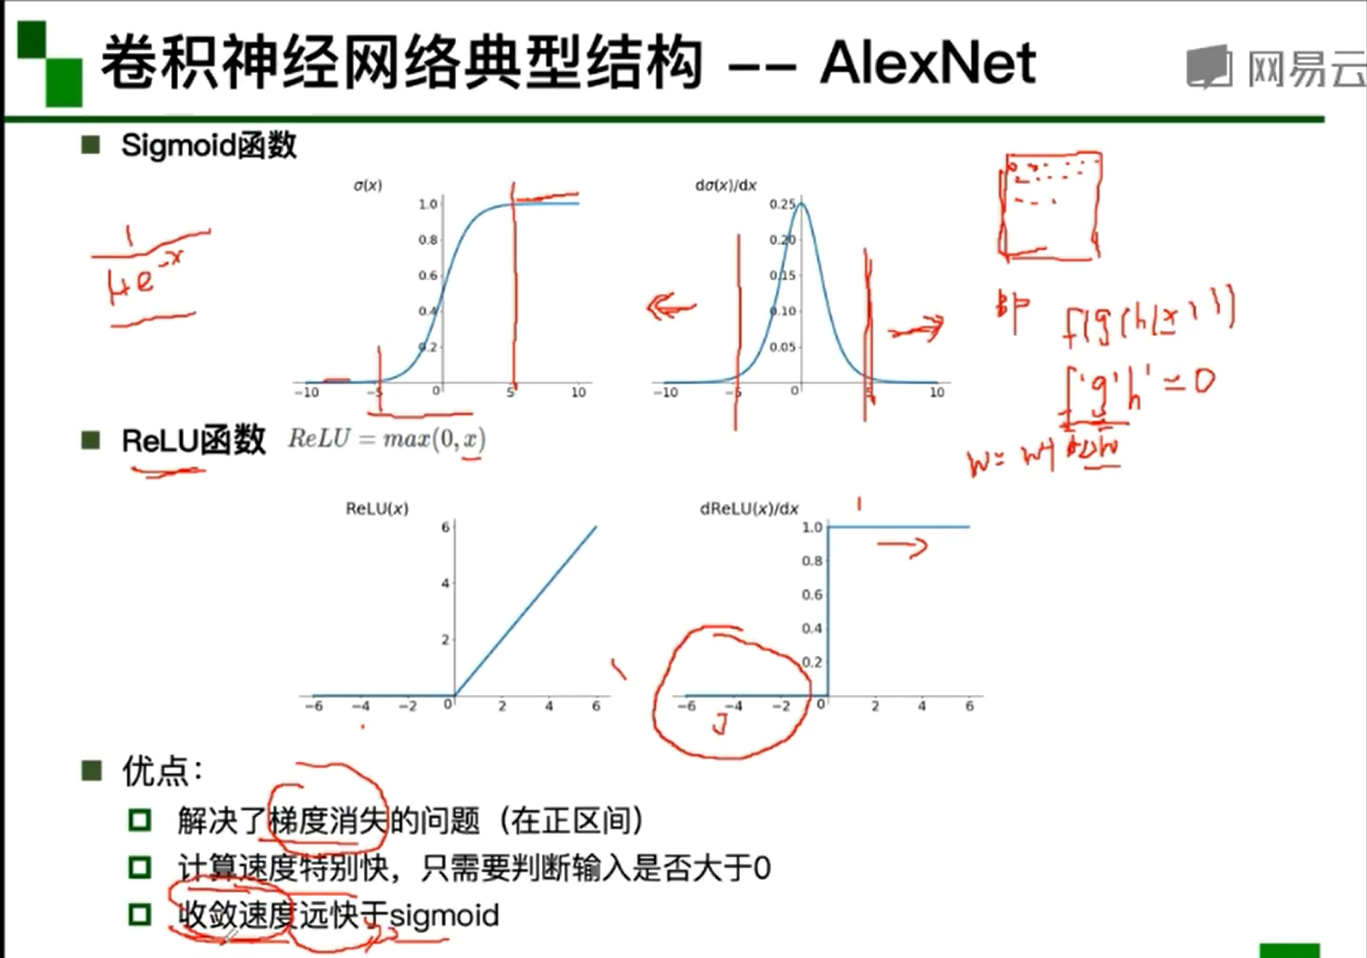
- 卷积神经网络典型结构:
- AlexNet:
- 大数据训练、非线性激活函数、防止过拟合和其他原因使其成功
- AlexNet分层解析:
- 第一次卷积:卷积–ReLu–池化
- 第二次卷积:卷积–ReLu–池化
- 第三次卷积:卷积–ReLu
- 第四次卷积:卷积–ReLu
- 第五次卷积:卷积–ReLu–池化
- 第六次卷积:全连接–ReLu–DropOut
- 第七次卷积:全连接–ReLu–DropOut
- 第八次卷积:全连接–SoftMax
- DropOut(随机失活):训练时随机关闭部分神经元,测试时整合所有神经元(防止过拟合的技术)
- 数据增强(平移、翻转、对称;改变RGB通道强度)
- ZFNet:(网络结构与AlexNet相同,只是改变了一些部分如感受野……)
- VGG:(更深的网络:8layers -> 16~19layers)
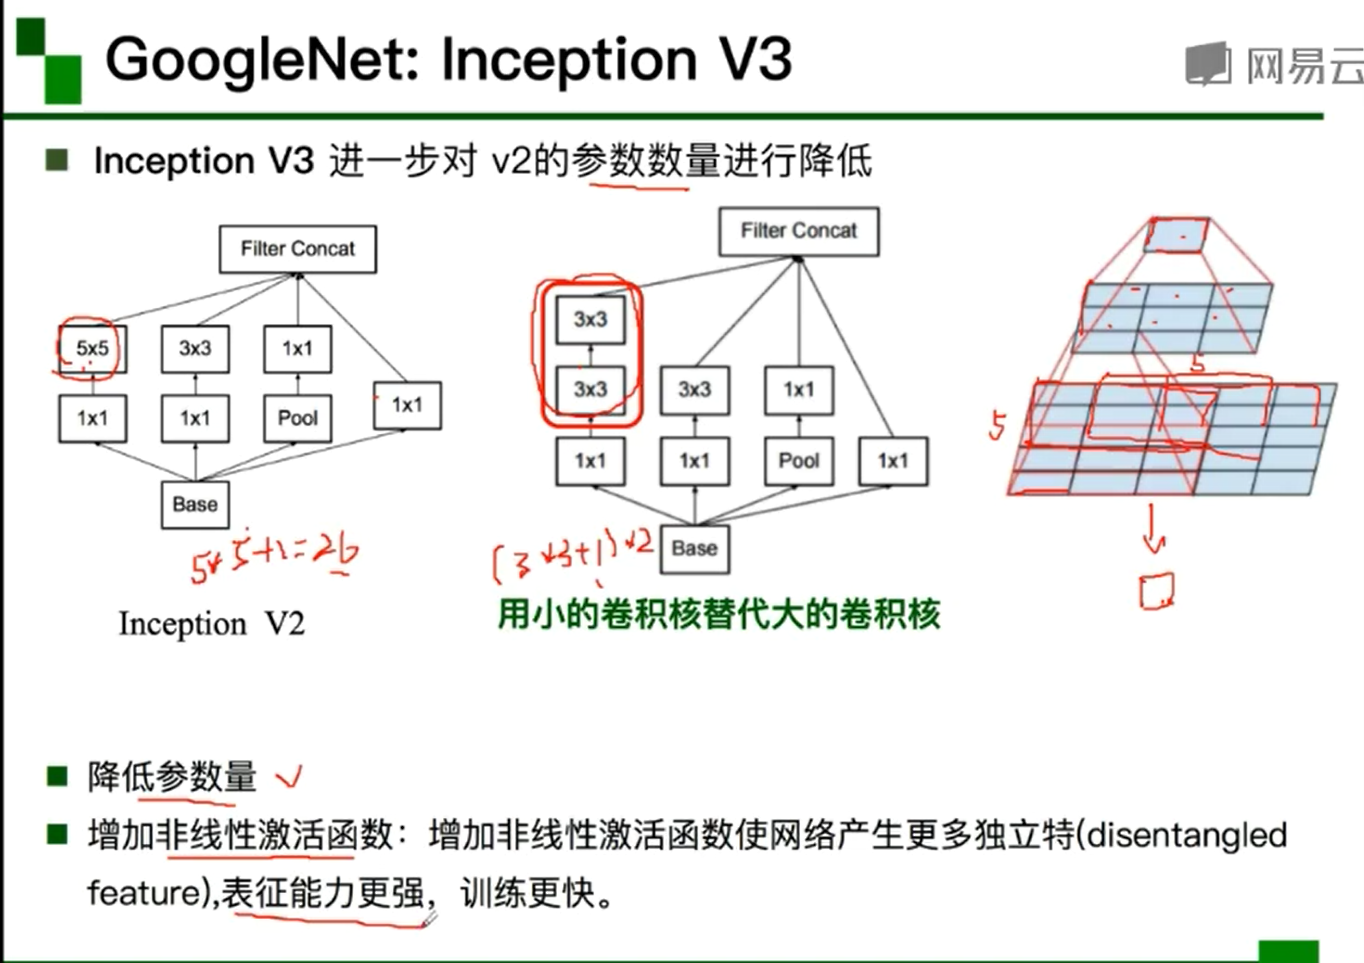
- GoogleNet:(网络层数深22,参数量较少,没有FC层)
- Stem部分:卷积-池化-卷积-卷积-池化
- 输出:没有额外的全连接层(除了最后的类别输出层)(所以参数量少)
- 辅助分类器:解决由于模型深度过深导致的梯度消失的问题
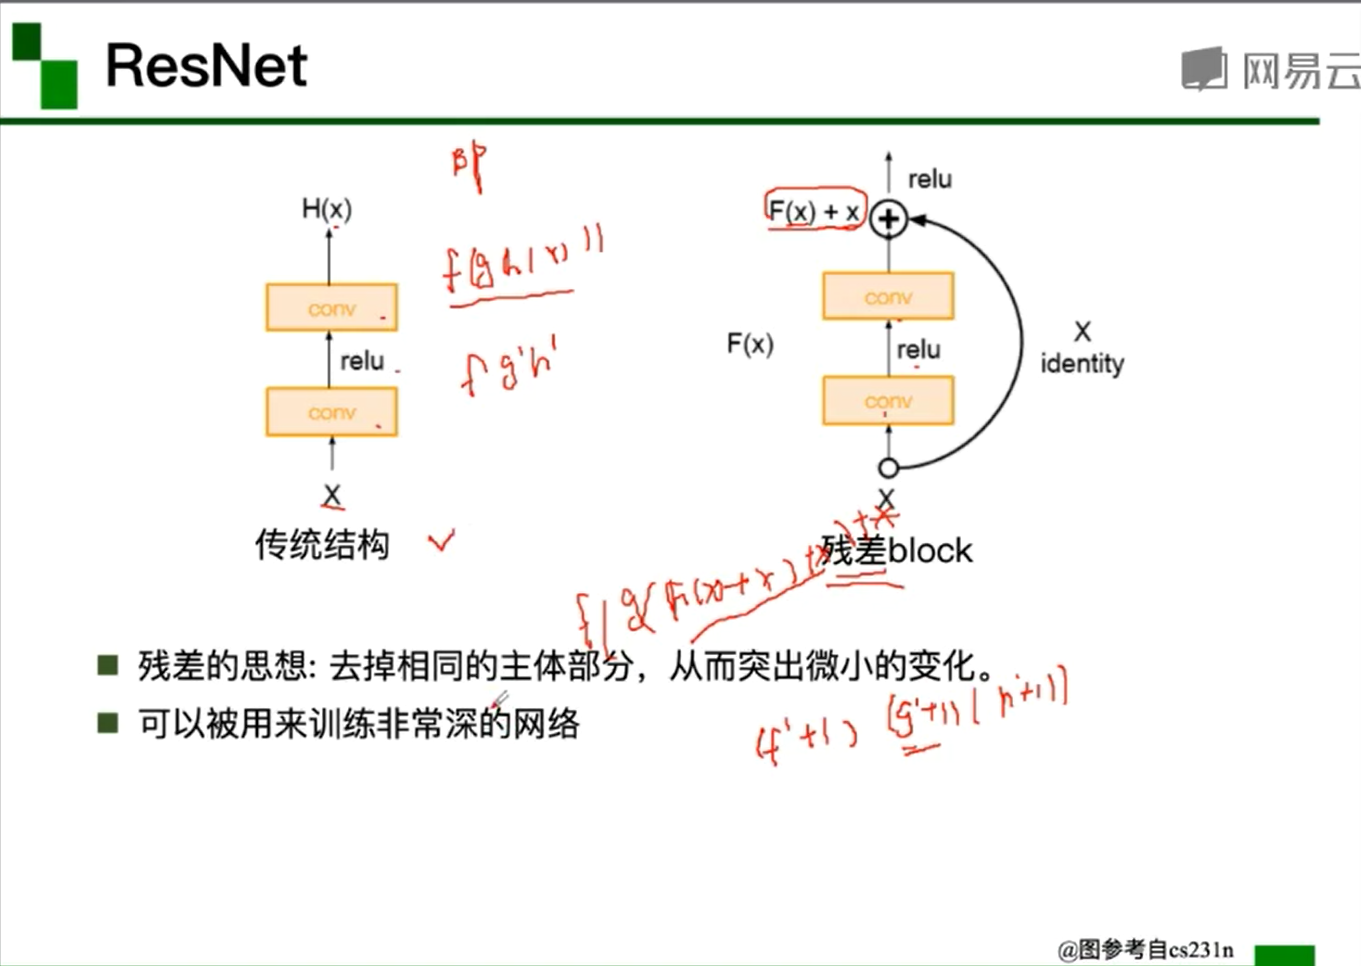
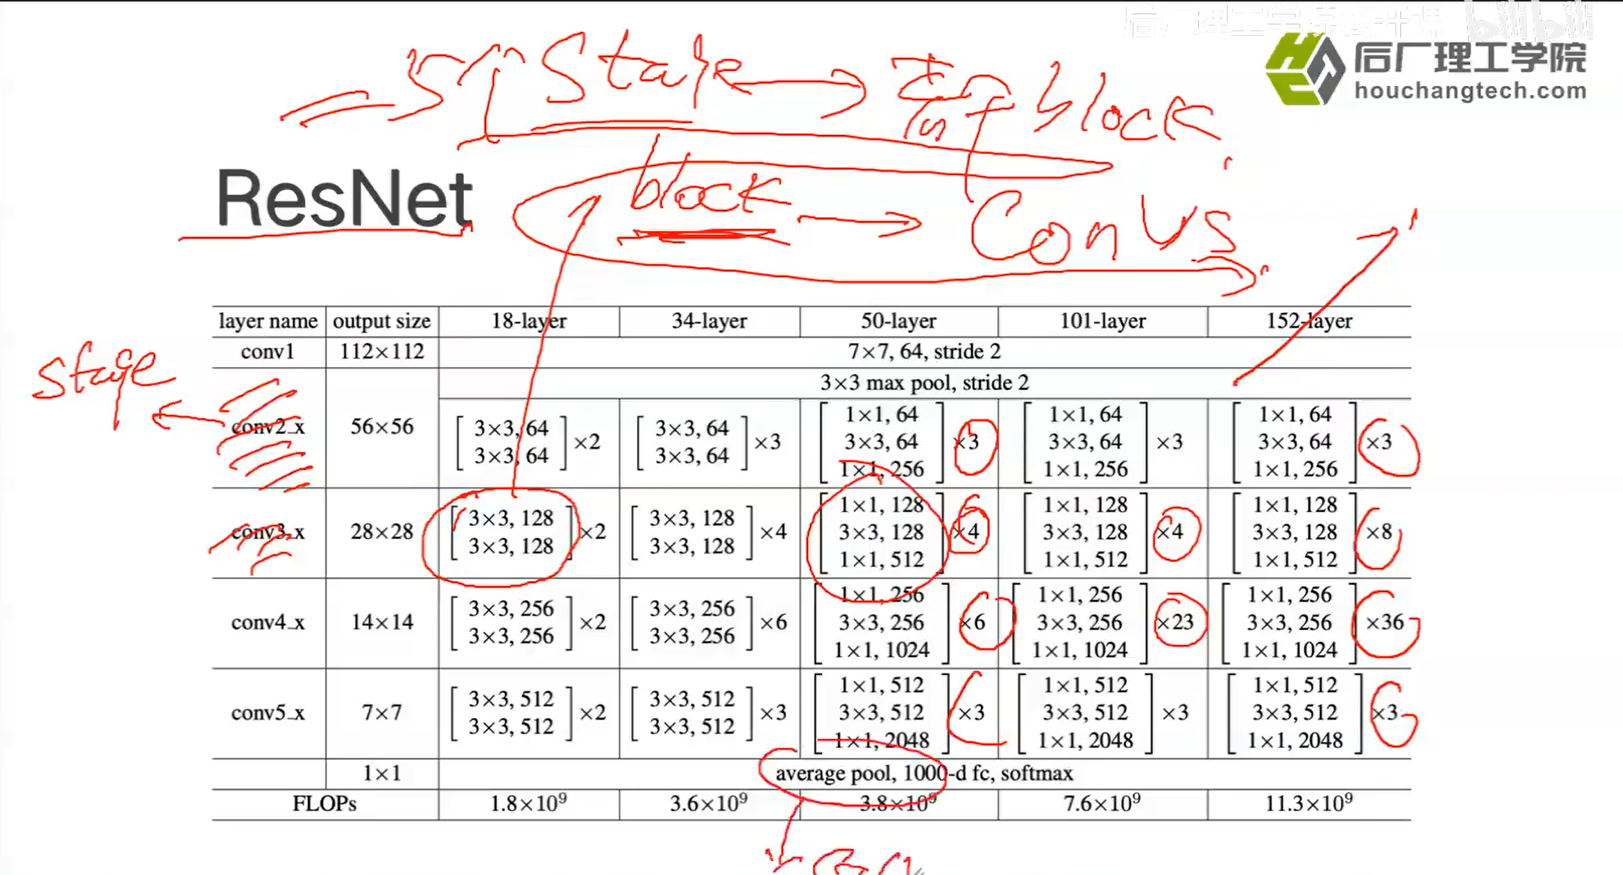
- ResNet:(残差学习网络,深度有152层[虽然很深,但没有出现梯度消失问题])
- AlexNet:
京东专家结合 pytorch 代码讲解 ResNet(扩展学习)
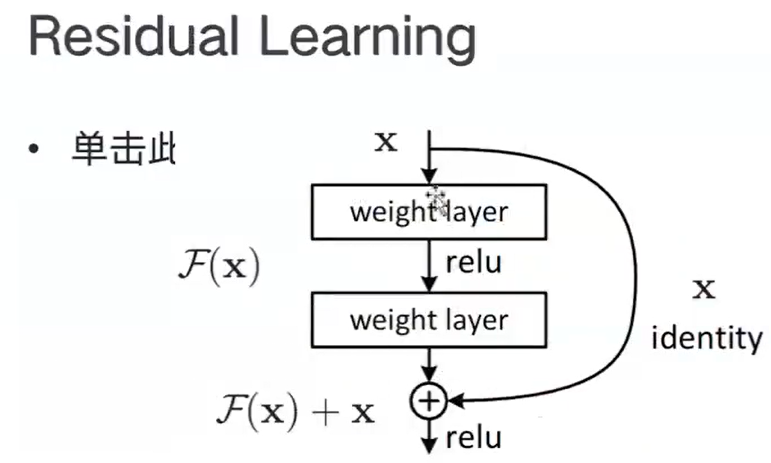
- CNN => 函数拟合(复杂函数)。有定理证明,如果层数足够深,CNN可以拟合任何一个函数。
- 残差学习的概念:当网络层数越来越深,出现网络退化现象(不是过拟合导致的)=> 难以训练H(x) => 改训练可以训练的F(x)=H(x)-x【H(x)-x在数学中称为残差Resideal】=> H(x)=F(x)+x,变相方式训练H(x),此过程叫做残差学习。
- 全局平均池化(Global Average Pooling):作用 :可以替代全连接层 => 参数更少 => 更少地出现过拟合现象
- RetNet里,五十层以上的block由三层组成,五十层以下的block由两层组成,不同之处在于BottleNeck:
- 使用BottleNeck结构的原因是,如果不降维,在网络深度增加的时候,参数量会非常大。
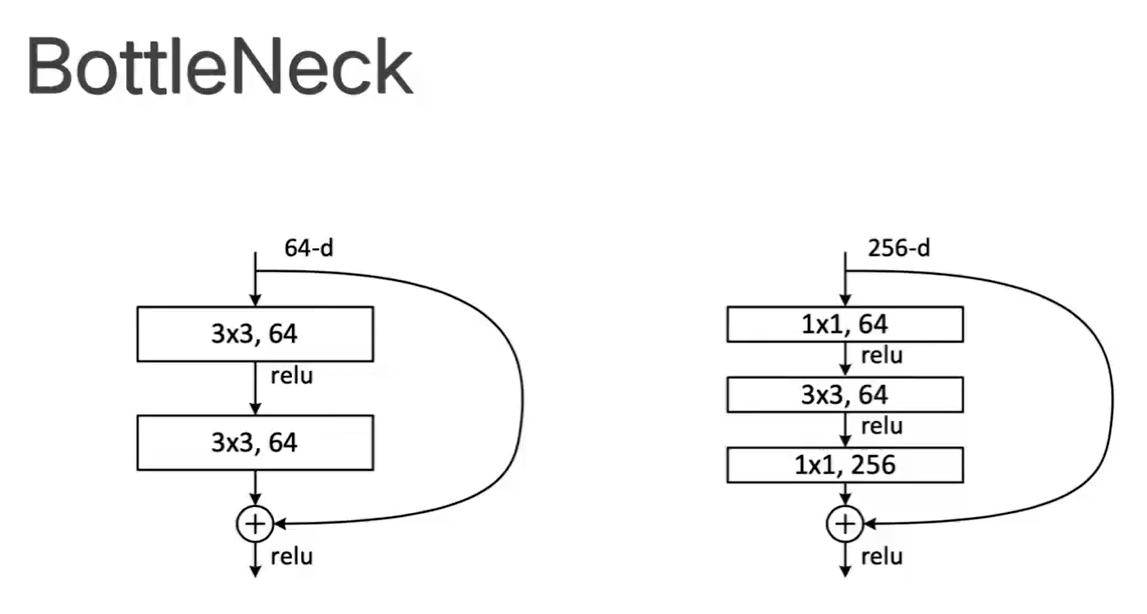
- 使用BottleNeck结构的原因是,如果不降维,在网络深度增加的时候,参数量会非常大。
- 使用 pytorch 实现 ResNet152
- 原理图:
- 实现代码(根据视频讲解对相应部分进行注释,代码不完全实现)
1
2
3
4
5
6
7
8
9
10
11
12
13
14
15
16
17
18
19
20
21
22
23
24
25
26
27
28
29
30
31
32
33
34
35
36
37
38
39
40
41
42
43
44
45
46
47
48
49
50
51
52
53
54
55
56
57
58
59
60
61
62
63
64
65
66
67
68
69
70
71
72
73
74
75
76
77
78
79
80
81
82
83
84
85
86
87
88
89
90
91
92
93
94
95
96
97
98
99
100
101
102
103
104
105
106
107
108
109
110
111
112
113
114
115
116
117
118
119
120
121
122
123
124
125
126
127
128
129
130
131
132
133
134
135
136
137
138
139
140
141
142
143
144
145
146
147
148
149
150
151
152
153
154
155
156
157
158
159
160
161
162
163
164
165
166
167
168
169
170
171
172
173
174
175
176
177
178
179
import torch //引入库
import torch.nn as nn
from torch.hub import load_state_dict_from url//把网络结构搭起来以后,直接引入 pytorch里面已经训练好的预训练的权重(在函数load_state_dict_from url里加载)
model_urls={//模型权重值的路径
………………
}
/*
关于bias=False:当卷积层后跟着bn层的时候,卷积层是不需要bias的。
因为在bn层中,它会重新计算重新学习均值和方差,所以是不需要定义偏差的。
这样的话可以节省存储量,即使定义了也没有用,它也会重新算。
*/
//封装3×3卷积操作
def conv3×3(in_planes, out_planes, stride=1, padding=1);
return nn.Conv2d(in_planes, out_planes, kernel_size=3, stride=stride, padding=padding, bias=False)//in_planes, out_planes为输入输出通道数的大小
//封装3×3卷积操作
def conv1×1(in_planes, out_planes, stride=1);
return nn.Conv2d(in_planes, out_planes, kernel_size=1, stride=stride, bias=False)//in_planes, out_planes为输入输出通道数的大小
class BasicBlock(nn.Module)://定义类
expansion = 1 // 经过block后channel的变化量
def __init__(self, inplanes, planes, stride=1, downsample=None, norm_layer=None): //定义初始化函数
super(BasicBlock,self).__init__() //调用父类初始化的函数
if norm_layer is None: //如果没有指定BatchNormalization,那么就使用标准的
norm_layer = nn.BatchNorm2d
self.conv1 = conv3×3(in_planes, planes, stride) //定义第一层网络层(3×3卷积),调用前面封装好的函数操作
self.bn1 = norm_layer(planes) //定义卷积层后接着定义BatchNormalization
self.relu = nn.ReLu(inplace = True)//调用激活函数ReLu
self.conv2 = norm_layer(planes,planes) //定义第二层
self.bn2 = norm_layer(planes)
self.downsample = downsample
self.stride = stride
def forward(self, x): //在forward函数里真正去调用我们的层
identity = x //先把输入存起来
//调用定义好的层
//调用第一个卷积层
out = self.conv1(x)
out = self.bn1(out)
out = self.relu(out)
//调用第二个卷积层
out = self.conv2(out)
out = self.bn2(out)
//进行下采样,因为网络有的地方的尺寸已经发生了变化
if self.downsample is not None:
identity = self.downsample(x) //此时x也要进行下采样,这样才能保持同步 => downsample调整x的维度,F(x)+x一致才能相加
out += identity //残差学习里面的F(x)+x,这里out为F(x)
//等一二层融合后再调用ReLu
out = self.relu(out)
return out //返回结果
class BottleNeck(nn.Module) //定义瓶颈类
expansion = 4//定义变量expansion,统一通道数的变化
def __init__(self, inplanes, planes, stride=1, downsample=None, norm_layer=None):
super(BottleNeck, self).__init__()
if norm_layer is None
norm_layer = nn.BatchNorm2d
self.conv1 = conv1×1(inplanes, planes)
self.bn1 = norm_layer(planes)
self.conv2 = conv3×3(planes, planes, stride)
self.bn2 = norm_layer(planes)
self.conv3 = conv1×1(planes, planes*self.expansion) // 输入的channel数:planes*self.expansion
self.bn3 = norm_layer(planes*self.expansion)
self.relu= nn.ReLu(inplace = True)
self.downsample = downsample
self.stride = stride
def forward(self, x):
identity = x
out = self.conv1(x)
out = self.bn1(out)
out = self.relu(out)
out = self.conv2(out)
out = self.bn2(out)
out = self.relu(out)
out = self.conv3(out)
out = self.bn3(out)
if self.downsample is not None
identity = self.downsample(x)
out += identity
out = self.relu(out)
return out
class ResNet(nn.Module): //开始组装ResNet网络
def __init__(self, block, layers, num_class=1000, norm_layer=None): // num_class=1000表示在图像识别网络训练的时候,训练集里有1000个类别
super(ResNet, self.__init__)
if norm_layer is not None:
norm_layer = nn.BatchNorm2d
self.inplanes = 64
//最核心部分
self.conv1 = nn.Conv2d(3, self.inplanes, kernel_size=7, stride=2, padding=3, bias=False)
self.bn1 = norm_layer(self.inplanes)
self.relu = nn.ReLu(inplace=True)
self.maxpool = nn.MaxPool2d(kernel_size=3, stride=2, padding=1)
//这里不同的layer代表不同的stage,这里有四个stage
self.layer1 = self._make_layer(block, 64, layers[0])
self.layer2 = self._make_layer(block, 128, layers[1], stride=2)
self.layer3 = self._make_layer(block, 256, layers[2], stride=2)
self.layer4 = self._make_layer(block, 512, layers[3]. stride=2)
//四个stage后跟着一个最大平均池化
self.avgpool = nn.AdaptiveAvgPool2d(1,1)
//分类层,根据分类的数量来定义分类的结果
self.fc = nn.Linear(512*block.expansion, num_class)
//参数化的过程
for m in self.modules(): //循环所有层
if isinstance(m, nn.Conv2d) //如果该层为卷积层,就进行kaiming初始化
nn.init.kaiming_normal_(m.weight, mode='fan_out', nonlinearity='relu') //kaiming_normal_的应用场景是搭配ReLu激活函数
elif isinstance(m, (nn.BatchNorm2d, nn.GroupNorm)): //如果该层为bn层,就用0和1初始化
//对于BatchNormalization,常量初始化权重的值为0和1
nn.init.constant_(m.weight, 1)
nn.init.constant_(m.bias, 0)
//非常关键的函数,生成stage里的内容
def _make_layer(self, block, planes, block, stride=1):
norm_layer = self._norm_layer
downsample = None
if stride!=1 or self.inplanes!= planes*block.expansion: // 出现这种情况则需要下采样
downsample = nn.Sequential(
// downsample用1×1卷积来调整维度
conv1×1(self.inplanes, planes*block.expansion, stride), // 同时调整spatail(H×W)和channel两个方向
norm_layer(planes*block.expansion)
)
//定义要生成的层
layers[]
layers.append(block(self.inplanes, planes, stride, downsample, norm_layer)) //第一个block单独处理
self.inplanes = planes*self.expansion // 记录layerN的channel变化,具体看ppt的ResNet表格
//循环来生成里面的每一个层
for _ in range(1, block):// 从1开始循环,因为第一个模块前面已经单独处理
layers.append(block(self.inplanes, planes, stride, norm_layer=norm_layer))
return nn.Sequential(*layers) // 使用Sequential层组合blocks,形成stage
def forward(self, x)
x = self.conv1(x)
x = self.bn1(x)
x = self.relu(x)
x = self.maxpool(x)
x = self.layer1(x)
x = self.layer2(x)
x = self.layer3(x)
x = self.layer4(x)
x = self.avgpool(x) // 全局平均池化
x = torch.flatten(x,1) // 展平
x = self.fc(x) // 全连接层
return x
def _resnet(arch, block, layers, pretrained, progress, **kwargs): // 封装一下,加载预训练的参数
// 开始调用网络
model = ResNet(block, layers, **kwargs)
if pretrained: // 如果需要加载预训练的参数
state_dict = load_state_dict_from_url(model_urls[arch],
progress = progress)
model.load_state_dict(state_dict)
return model
def resnet152(pretrained=False, progress=True, **kwargs):
return _resnet('resnet152', BottleNeck, [3,8,36,3], pretrained, progress, **kwargs)
model = resnet152(pretrained=True) // pretrained=True表示使用预训练的参数,加载预训练模型
model.eval() // 直接看调用结果
………………此处省略一大段代码……………………
- 原理图: